
While it is a bit tricky for us non-magical humans to levitate objects with our minds, words, or wands, we can use technology to do (basically) the same things!
This project uses two micro:bits, a few small electronic parts, and some everyday objects from around the house to create our very own magical wand.
I went for the Wingardium Leviosa spell, but you can most certainly adapt this project to cast other spells 🙂
Difficulty: Beginner+ (a lil’ bit of experience w/ coding and circuits is helpful)
Read Time: 10 min
Build Time: ~ 2 hrs
Cost: ~ $35
Materials
- Wand!
- You can purchase custom wands or make your own! Find a suitable stick and add some flair (or leave it bare!), or get creative and make one out of things you can find around the house!
- Feather (for floating!)
- Glove (for hiding the micro:bit wand controller)
- Aluminum can
- Small piece of cardboard (~ 2″ x 2″/5cm x 5cm)
- Two (2) micro:bits
- Two (1) micro:bit battery packs and batteries
- If you get the micro:bit Go bundle, it comes with a battery pack and batteries!
- Two (2) microUSB cables
- One (1) Half-size (or mini) breadboard
- One (1) small 5V DC motor
- One (1) motor mount
- Or build one from cardboard and/or wooden dowels
- One (1) 9V Battery and battery clip leads
- One (1) N-Channel MOSFET
- I used a D4N06L (datasheet here) which is rated for 4A, 60Vdc. You can use a different MOSFET as long as it can handle at least 3A and 9Vdc.
- One (1) 100Ohm resistor
- One (1) diode
- Four (4) alligator-to-pin wires
- One (1) Jumper Wire
What are we doing??
One of my favorite scenes from the first Harry Potter book was when, after all of the other students are struggling, Hermoine makes a feather float with the spell Wingardium Leviosa. This simple spell captures the essence of why we love magic: that literally at the flick of our wrist and a few choice words, we can instantly make surprising (and impressive) things happen.
Although we don’t have exactly that kind of magic, we do have technology that sometimes seems miraculous. So that sort of counts!
By now you’ve probably guessed: To mimic my fav scene, I wanted to levitate a feather. For that, we can use the power of wind! For this beginner-friendly tutorial, I chose to use a small 5V DC motor with fan blades made from an aluminum can. You can imitate my design or, better yet, create your own!
This tutorial will show you how to do the following:
1. Write a simple block-based code for a micro:bit wand controller
2. Build a circuit to control a small, 5V DC motor
3. Write a simple block-based code for a magical receiver that is triggered with a radio signal (aka bluetooth)
4. Build a setup to make our tech really look like magic!
Code it: Wand Controller!
Let’s start with our magic wand!
Since this is a beginner-friendly project, we are using block-based coding on the Make Code website. If you have more experience w/ coding you can also program the micro:bit using micropython or C++ in your fav coding environment (e.g. Idle, Visual Studio Code, etc.).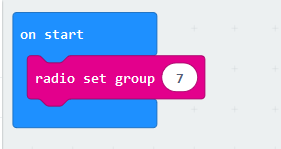
Alright, let’s get blockin’!
Step 1: In the On Start block, set the Radio Group number.
Pick a number you love and will remember, since we’ll also need this for the receiver.
Step 2: Decide how you want your wand to trigger action.
The micro:bit has an accelerometer which measures changes in acceleration in our three spatial dimensions: up/down, left/right, and forwards/backwards.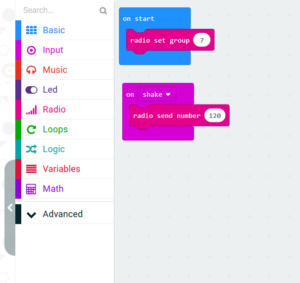
Quick solution: Use the “on shake” block! (Code 1, above photo)
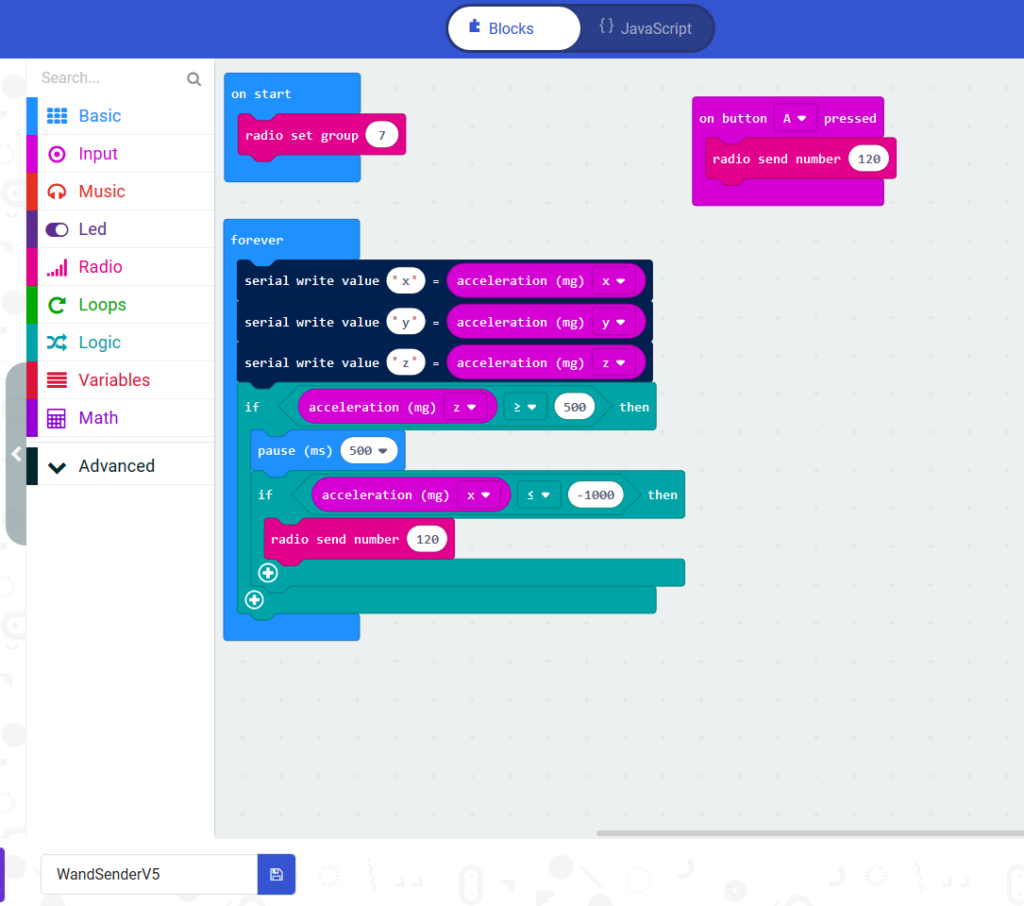
More complex, gesture-based solution: Explore how the accelerometer works and observe the output as you make gestures (open the Arduino IDE Serial Monitor to see the output, if you need help with this check out this tutorial). Use your observations to set triggers. (Code 2 in the above photo)
The example in Code 2 is my attempt at a Wingardium Leviosa gesture: swish-and-flick! (down and left) Use it as-is or as a starting point for your own fav magical gesture!
Helpful Tips:
(1) Since microcontrollers process information super quickly, the pause block gives us time to finish the first part of the gesture before the micro:bit checks for the second part.

(2) I added axes labels on the micro:bit so I could more easily figure out how to get the right motion for Wingardium Leviosa spell — definitely recommend this!
Step 3: Use the gesture to send a radio number.
The “radio send number” block is found in the “radio” block set. Any (rational, real, non-infinite) number will work!
Step 4: Download and save the code onto the micro:bit!
The micro:bit power lights will flash as this is happening, when they are done flashing the code is finished uploading.
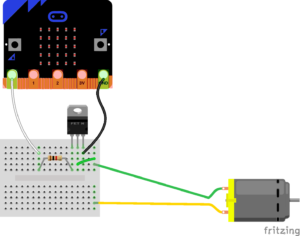
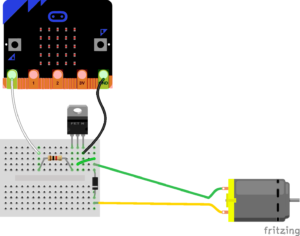
Build it: Magical Receiver!
Grab your second micro:bit, your breadboard, and all the fun electronic parts and pieces!
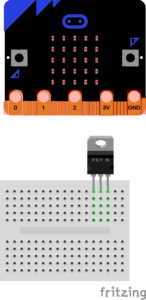
Step 1: Insert your MOSFET transistor into the breadboard.
Recommended to have the black part of the transistor facing you so that pin references in these instructions are accurate 🙂

Step 2: Grab one of your pin-ended alligator clips and connect it from micro:bit pin P0 to an open row in the breadboard.
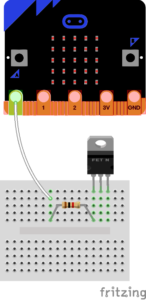
Step 3: Connect your resistor between the micro:bit P0 wire and the MOSFET Gate pin (leftmost pin).
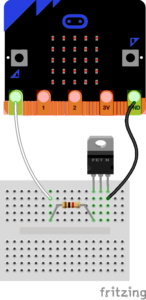
Step 4: Connect a pin-ended alligator clip between micro:bit GND pin and the MOSFET source pin (rightmost pin).

Step 5: Using your two remaining pin-ended alligator clips, connect the motor leads to two open rows in the breadboard.
Step 6: Connect your jumper wire from one of the motor wires to the MOSFET drain pin (middle pin).
Step 7: Connect your diode across the motor terminals so that the negative side (w/ the stripe) connects to the remaining motor wire (yellow wire in photo).
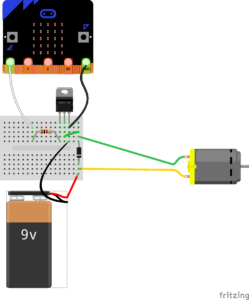
Step 8: Connect the negative (black) battery lead to the MOSFET source pin (same row as micro:bit GND).
Step 9: Connect the positive (red) battery lead to the remaining motor wire (yellow wire).
Code it: Magical Receiver!
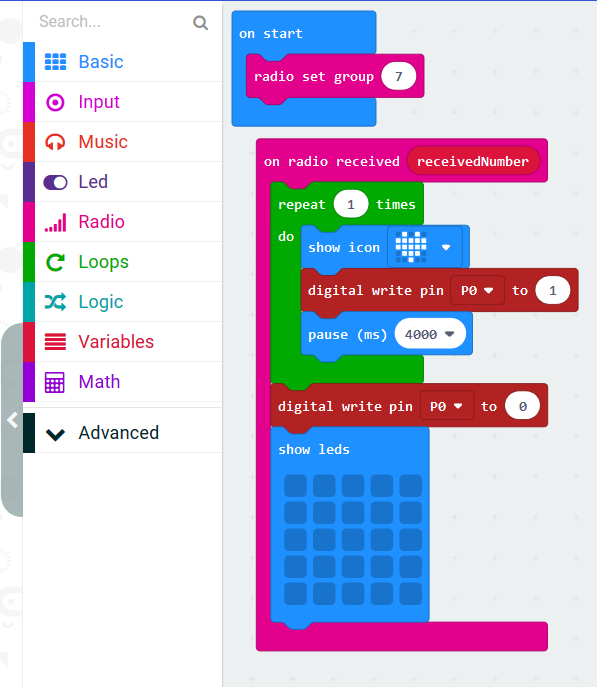
Step 1: Set Radio Group to be the same as for the Wand Controller.
Step 2: Pull out a “on radio received” block and set it to “receivedNumber”.
Step 3: Drag a repeat block into the “on radio received” block and switch it to repeat 2 – 3 times.
Step 4: (Optional but recommended) Show an icon on the micro:bit to let you know if it received the string.
This is super duper helpful for debugging.
Step 5: Turn on Digital Pin 0! (aka “digital write pin P0” to 1)
This block is found under the “Pins” block under the Advanced tab.
Step 6: Pause for a few seconds.
I chose 4 seconds, you can keep this or adjust as desired.
Step 7: Turn off Digital Pin 0 (“digital write pin P0” to 0) and the micro:bit display.
Step 8 (Optional but recommended): Add a back-up trigger using micro:bit button A for testing and debugging purposes 🙂
Voila! Download the code onto your Magical Receiver micro:bit and we’re ready for the magical prop!
Let’s make wind!
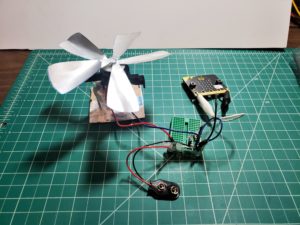
Let’s make a wind generator!! AKA a fan 🙂 Turn on a hot glue gun and grab your scissors, permanent marker, aluminum can, and some cardboard.
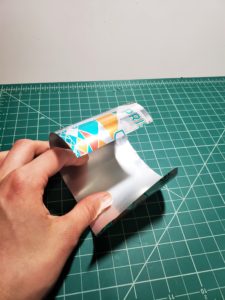
Step 1: Carefully cut out a rectangle of aluminum from an empty can and a small circle of cardboard about 1/2″ (1 cm) in diameter.
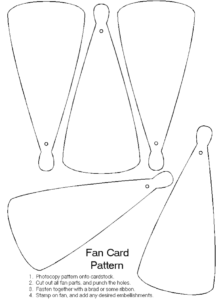
Step 2: Print out the paper fan template above at 50% to scale. Cut out one of the fan blades and trace it five (5) times onto the aluminum foil.
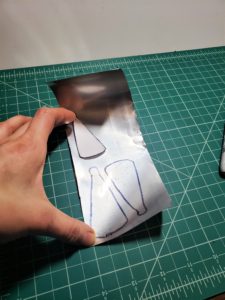
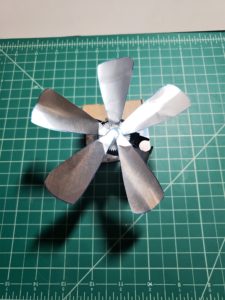
Step 3: Carefully cut out the aluminum fan blades and glue onto the cardboard circle at equal intervals.
Step 4: Glue the motor mount onto a piece of cardboard (I also added “legs’ made of wooden dowels to make it easier to connect the alligator clips).
Other options:
- Use the motor drive shaft to spin objects or make some gears/levers to move things in different directions
- If you connect micro:bit to speakers, it can also play sounds!
- Start with something simple and play around to find something that makes you feel magical.
Test all the things!
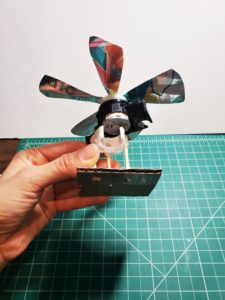
And now, for our favorite part: testing!! Power up your micro:bits (and connect the battery) and move your wand controller (or use the quick button trigger) to test that our magical receiver moves the motor.
When you are done testing, coat the magical receiver connections in hot glue to hold them in place. If you want an ultra-permanent solution, use epoxy (waterproof is a nice bonus feature). Be careful to avoid getting glue (and especially epoxy) on your micro:bits so that you can still use them for future projects!
Note: When you first power everything up, the motor may start spinning without a signal. Trigger the wand controller and it should stop, then behave as expected.
Not working as expected?
Debugging is an almost inevitable part of building things, so congratulations! You are officially a maker! Here are some debugging tips:
1. Power is the most common issue for makers of all experience levels. Double check that the battery is properly connected and both the micro:bit power lights are on (those little yellow lights by the microUSB port).
2. Motor not moving? Be sure none of the wires or other objects are in the way.
3. Motor pulling the feather towards it rather than away? Swap the orientation of the motor leads. This will cause the motor to spin in the opposite direction and thus the air will be pushed in the opposite direction.
Make all the magic!
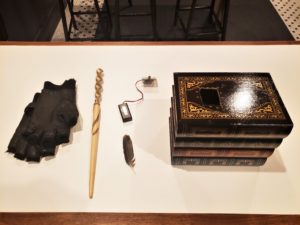
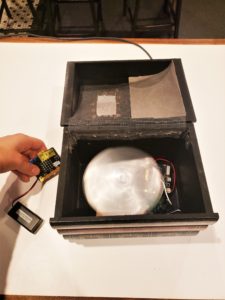
We’re basically wizards now! Use gloves to hide and hold the micro:bit wand controller and battery pack. Hide your magical receiver in a fantastical container to really impress all the people. I snagged a hollow book stack, cut a hole in the top, and glued my motor with the fan inside.
That’s it! Practice your spell and impress your friends with your new-found powers.
Questions, comments, creations? Leave a comment! Happy making, you magical beings!