
Save and access docs and photos and music on your own local Pi Cloud* server! The best part: you can use it if, or when, the Internet goes down (or if you’re in a remote spot & want access to Wikipedia). Oh hey, and if your friend gets one and they live close (*ahem*80ft*ahem*), you can share stuff with them and make your own personal chat line!
That gets me thinking.. if enough folks built Pi Cloud servers, we could crowdsource the Internet! That would be an 11/10 on a scale of greatness. With the new models of the Raspberry Pi computer, it’s possible and not even expensive! (What! Tell me more!)
This tutorial will show you how to set up a short-range (~ 80 ft) WiFi Access Point and a personal web server (‘bringin it back to HTML bbies). You can set this up as a (closed) local network only (i.e. your own personal “cloud” backup device), or broadcast it to the rest of the world! (..if you do this be sure you know network security.)
That said, assuming you have a basic knowledge of the Pi, here’s the breakdown:
Read Time: ~ 40 min
Build Time: ~ 60 min (less if you are experienced w/ Linux)
Cost: ~ $35 (for the Pi 3)
If you are interested in using this to crowdsource a people’s Internet, share it w/ your friends & family & everyone you know (or build it for them!). If you build this project please mark that you’ve built it so we can get a sense of how many folks have the infrastructure we need to actually make a full-fledged people’s Internet. Lastly, follow me to stay updated (I am reaching out to some folks to try to get this to be a real thing, please feel free to contact me if you can help and/or take this on, it is open-source!).
New to Linux & Terminal Programming?

We’ll need to be able to access our Pi remotely (e.g. via SSH). If you’re like “wtf is that”, check out this introductory tutorial for a more thorough overview on how to set up the Raspberry Pi 3 and some quick Linux terminal programming.
This approach to the Pi Access Point* and web server** uses the Jessie Lite OS. If you follow this tutorial line-by-line, you will need this specific version of Linux.
Lastly, this tutorial is built off of the Adafruit Digital Free Library tutorial, so check that tutorial if you run into any issues (or leave a comment and myself or another helpful folk will attempt to answer your question 🙂 )
(Also, this might feel a bit long, so I’ve included various cute puppy photos throughout to keep you motivated :D)
*An Access Point is hardware device that allows a WiFi device (e.g. smartphone) to connect to a wired network (e.g. router).
**A web server is a computer that delivers a web page. When you go to your favorite websites, you type in “www.wikipedia.org” which takes you to the IP address for the web server and displays public information.
Warning: it is recommended to run your Pi as a local network only (i.e. do not connect the Pi to the broader World Wide Web) as the WPA2 password protocol may not be secure.
Materials
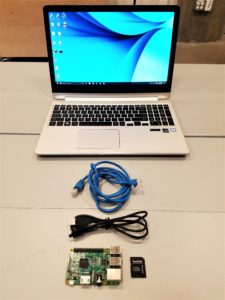
– Computer with Ethernet port & SD Card slot
– SD Card (8GB or larger, esp. if you want to use it for storage)
– Recommended: Raspberry Pi Case
Software Programs

1. PuTTY allows us to remotely log in to the Raspberry Pi using the Pi’s IP address, username, and password.
Download here: http://www.putty.org/
2. Etcher formats and writes the Raspbian (or other) Operating System (“OS”) to an SD card.
Download here: https://etcher.io/
3. WinSCP allows for easy file transfer between your computer and the Raspberry Pi.
Download here (click on Installation Package): https://winscp.net/eng/download.php
4. Windows computers will need Bonjour print services for Windows (from Apple) to use the “raspberrypi.local” IP address.
Download here: https://support.apple.com/kb/dl999?locale=en_US
Quickstart
If you’ve worked with the Pi before and are comfortable w/ the Linux terminal and such, here’s a quick overview of this process:
1. Load Jessie Lite onto an SD card (8GB or more) and insert into the Pi.
Download the Jessie Lite OS here.
2. Remotely log in (e.g. SSH) and enter credentials.
3. Here’s a Github repository with all of the commands to turn your Pi into a web server 😀
Go through the Setup file and input the commands (in order). This process will install HostAPD (authentication), DHCP (IP management), iptables (firewall), and Apache (web server software).
4. Create a public web page or keep your files/data private/w/ friends & family.
A sample HTML web page adapted from the Adafruit Digital Free Library tutorial is included in the Github repository (ServerWebsiteHTML-Raw). You can also use the larger zip file to build off of 🙂
Warning: it is recommended to run your Pi as a local network only (i.e. do not connect the Pi to the broader World Wide Web) as the WPA2 password protocol may not be secure.
Set up the Raspberry Pi
1. Flash the SD card with Jessie Lite (download Jessie Lite here). Enable SSH by adding a file named “SSH” in the SD card file contents (no extensions — remove the .txt if any added automatically). Insert into the Pi.
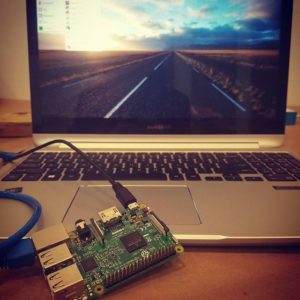
2. Plug in the Ethernet cable between your computer and the Pi, then plug the Pi power cable.
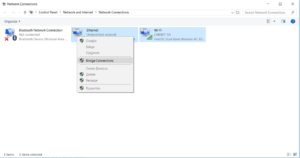
3. Create a network bridge between your computer and the Pi.
Go to Settings -> Network & Internet -> Change Adapter Settings. Select the Ethernet connection (should show an unknown connection or something similar). Hold the “CTRL” key, and then select the WiFi connection. Right click and choose “Bridge Connections.”
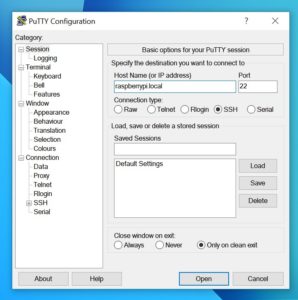
3. Open PuTTY, type “raspberrypi.local” for the hostname, and log into your Pi, woo!
If you are logging in for the first time, use the default username: pi and password: raspberry . Change your password using the command passwd .
4. Check that the Pi is connected to the Internet and update it.
Run this command to check if the Pi can connect to Google (it will print 5 lines saying it if received information from google.com):
ping -c 5 google.com
Run this command to update the Pi:
 sudo apt-get update
 sudo apt-get upgrade
Install Apache

Apache is our web server software! (It allows us to easily host information and files accessible via a web browser like Chrome, Firefox, Explorer, etc.).
Let’s install the Apache software and then change permissions to edit the HTML folder. Type and enter the following commands (in order):
sudo apt-get install apache2 -y
cd /var/www
sudo chown pi:pi /var/www/html
cd
Install Server Software!

1. Install HostAPD and DHCP software.
HostAPD is used to authenticate information sent and received from connected devices, and DHCP is a protocol used to provide quick, automatic, and central management for the distribution of IP addresses within a network.
To install both at once, type the following command and then press “y” to continue:
sudo apt-get install hostapd isc-dhcp-server
2. Install iptables for a firewall. (yayy for security!)
Run this command and type “y” (yes) to both of the config screens that pop up:
sudo apt-get install iptables-persistent
Edit the DHCP Configuration File
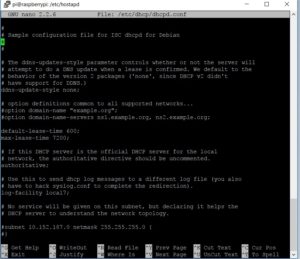
Let’s set up the DHCP communication protocol so we can send and receive information (pretty important if you’re thinking of building a connected network)! Go to the DHCP configuration file by typing the following:
sudo nano /etc/dhcp/dhcpd.conf
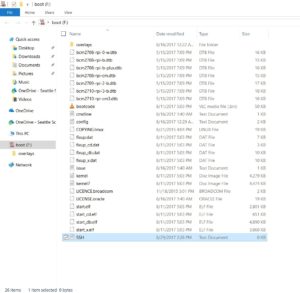
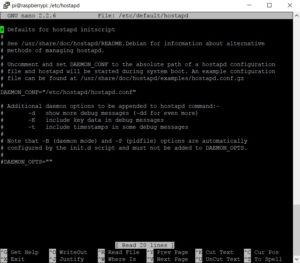
1. Add a comment (“#”) in front of the following lines (so it looks like the file in Photo 1):
option domain-name “example.org”;

option domain-name-servers ns1.example.org, ns2.example.org;
2. Remove the comment (“#”‘) from the “authoritative” line (Photo 1 also helpful here):
#If this DHCP server is the official DHCP server for the local network, the authoritative directive should be uncommented.

#authoritative;
3. Add this code to the very end of the file:
subnet 192.168.42.0 netmask 255.255.255.0 {
    range 192.168.42.10 192.168.42.50;
    option broadcast-address 192.168.42.255;
    option routers 192.168.42.1;
    default-lease-time 600;
    max-lease-time 7200;
    option domain-name “local”;
    option domain-name-servers 8.8.8.8, 8.8.4.4;
}
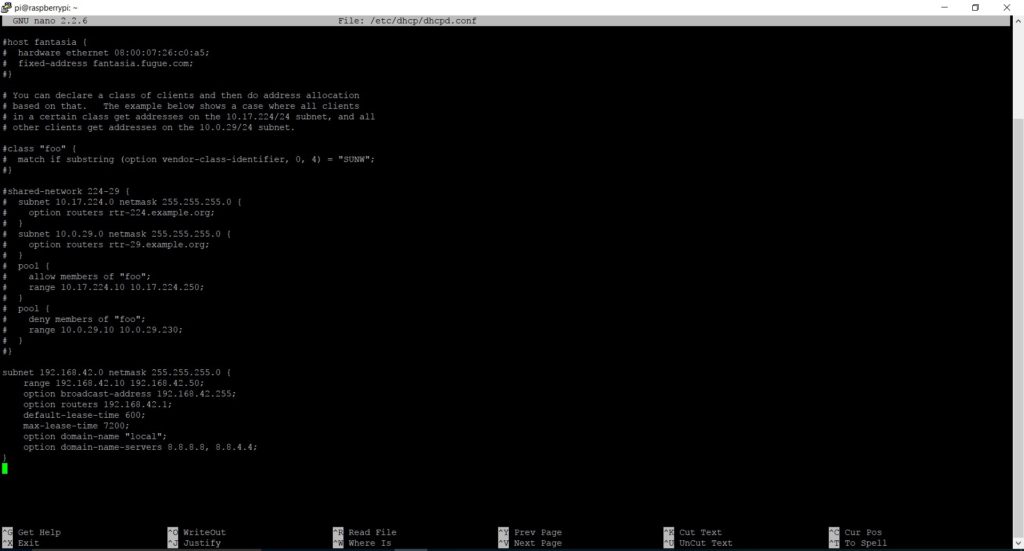
What is this doing?! To (very briefly) summarize, it sets up a range of IP addresses to assign to connected devices (from 192.168.42.10 to 192.168.42.50), just like your home router! It also tells the Pi how to communicate to other devices (its broadcast address, 192.168.42.255, and its own IP address, 192.168.42.1). It assigns an amount of time (in sec) to share this connection (lease time), and sets up domain name servers (like looking up a phone number in a directory).
4. Save and exit by pressing “Ctrl – X” and then “y” (and then the enter key).
Edit the Default DHCP Server File

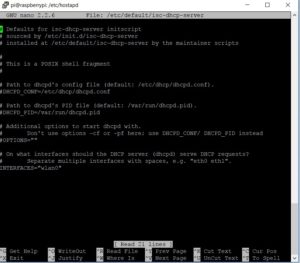
Let’s edit the DHCP server file so that we can assign it to broadcast via WiFi! Go to the DHCP default server file by typing the following:
sudo nano /etc/default/isc-dhcp-server
1. Scroll down to the line that says INTERFACES=”” and change it to broadcast via wlan0 (that’s a zero, not an O):
INTERFACES=”wlan0”
2. Save and exit by pressing “Ctrl – X” and then “y” (you’ve probably figured this out key combo by now so I’ll stop mentioning it 🙂 ).
Set Up a Static IP Address

1. Let’s give our Pi a static (unchanging) IP address so that we can always find it, yay! Temporarily disable the wireless interface network:
sudo ifdown wlan0
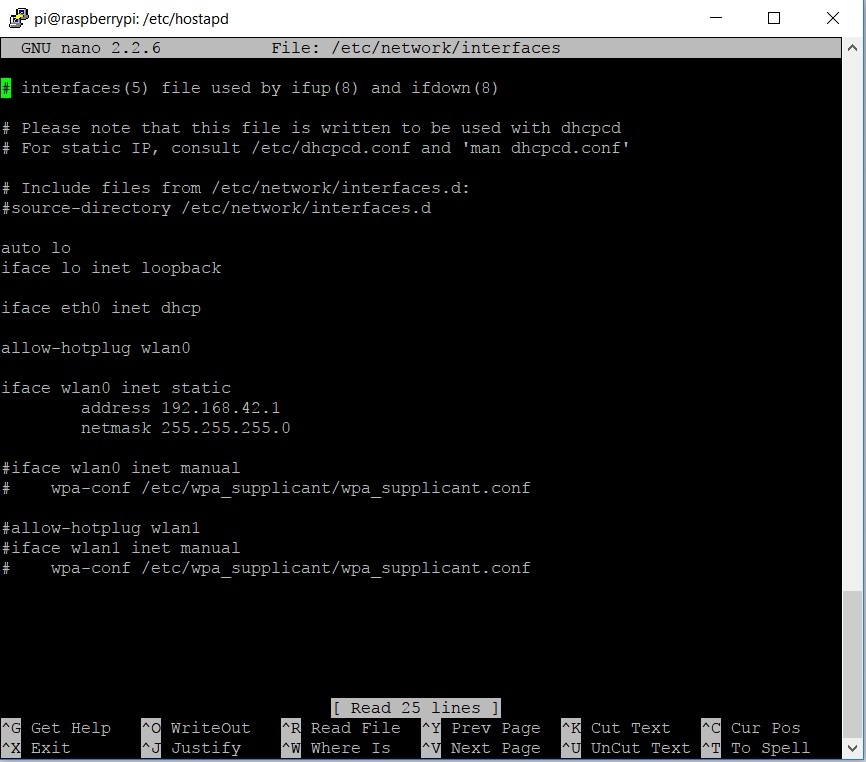
2. Use the nano text editor program to edit the network interfaces file (which you probably figured out by reading the command (: )
sudo nano /etc/network/interfaces
3. Edit the file so that it looks exactly like the following, then exit & save (also check out the photo below):
auto lo
iface lo inet loopback
iface eth0 inet dhcp
allow-hotplug wlan0
iface wlan0 inet static
    address 192.168.42.1
    netmask 255.255.255.0
#iface wlan0 inet manual
#wpa-roam /etc/wpa-supplicant/wpa_supplicant.conf
#iface default inet dhcp
4. Assign a static IP:
sudo ifconfig wlan0 192.168.42.1
Configure the Access Point Details
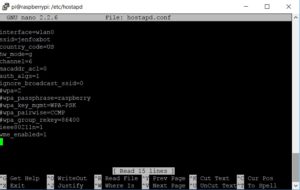
1. Create a new configuration file named “hostapd”:
sudo nano /etc/hostapd/hostapd.conf
2. Write the following (exactly as-is) in this new configuration file (then exit & save) (see photo below):
interface=wlan0
ssid=HelloWorld #Name of your RPi WiFi connection
country_code=US #Unless you are elsewhere!
hw_mode=g
channel=6
macaddr_acl=0
auth_algs=1
ignore_broadcast_ssid=0
wpa=2 #This is the password protocol
wpa_passphrase=raspberry #Change the password!
wpa_key_mgmt=WPA-PSK
wpa_pairwise=CCMP
wpa_group_rekey=86400
ieee80211n=1
wme_enabled=1
3. Tell the HostAPD protocol where to find this new file.
Edit the default HostAPD file:
sudo nano /etc/default/hostapd
Find the line that says #DAEMON_CONF=””. Remove the comment and edit it so that it looks like this (see photo below):
DAEMON_CONF=”/etc/hostapd/hostapd.conf”
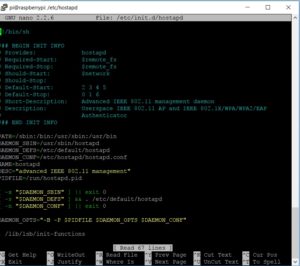
Edit the HostAPD initialization file:
sudo nano /etc/init.d/hostapd
Find the line that says DAEMON_CONF=. Edit it so that it to point to your new configuration file! Like this (Photo 3):
DAEMON_CONF=/etc/hostapd/hostapd.conf
Configure Network Address Translation (“NAT”)
 This step allows for multiple clients (like all your friends!) to connect to the Pi’s WiFi at once (play all the games!!). It is a bit technical, so I’m gonna gloss over the deets (also not terribly familiar with this part), but it will get you through the process.
Note: you only need the iptables shenanigans if you want to connect your local access point to the greater World Wide Web.
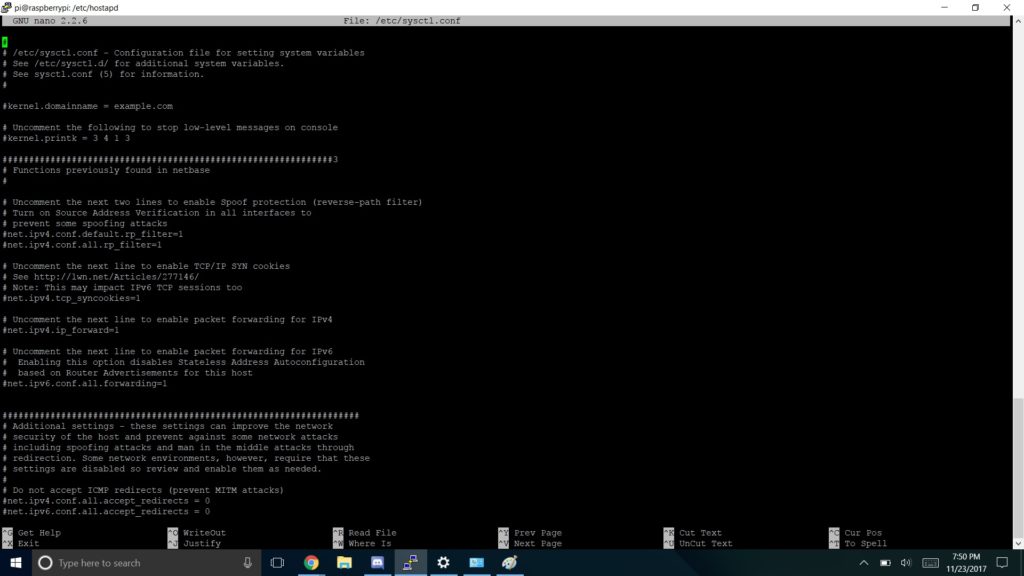
1. First, we need to start IP forwarding every time the Pi turns on. Enter the following command to edit the sysctl* configuration file:
sudo nano /etc/sysctl.conf
— Scroll to the bottom and type this code on a new line, then exit & save:
net.ipv4.ip_forward=1
*btw that is an L in sysctl, not a 1, which I have messed up soooo many times -.-
2. Activate IP forwarding by typing:
sudo sh -c “echo 1 > /proc/sys/net/ipv4/ip_forward”
3. Create network translation between the Ethernet port eth0 and the WiFI port wlan0 by typing the following commands (w/ – signs and caps and such):
sudo iptables -t nat -A POSTROUTING -o eth0 -j MASQUERADE
sudo iptables -A FORWARD -i eth0 -o wlan0 -m state --state RELATED,ESTABLISHED -j ACCEPT
sudo iptables -A FORWARD -i wlan0 -o eth0 -j ACCEPT
4. To ensure network translation happens when we reboot the Pi, run this:
sudo sh -c “iptables-save > /etc/iptables/rules.v4”
Test that Access Point!

1. Run hostapd with our configuration file manually with this command:
sudo /usr/sbin/hostapd /etc/hostapd/hostapd.conf
2. Check the WiFi list on your computer or smartphone and find your new access point SSID! If you didn’t change anything, it will be named “HelloWorld” with a password of “Raspberry”.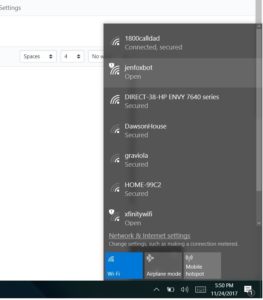
If you connect successfully, you will get some text on the Raspberry Pi screen. We won’t see much yet, but we are very close!
3. Cancel the test by typing “Ctrl+C” in the Raspberry Pi console.
You can check the status of the host AP server and the DHCP server with the following commands:
sudo service hostapd status
sudo service isc-dhcp-server status
Set up a Daemon!
 A daemon is a program that starts automatically every time the Pi is powered on and runs in the background (not quite like the “His Dark Materials” series..).
1. Start the hostapd and dhcp programs:
sudo service hostapd start
sudo service isc-dhcp-server start
2. Run these next two commands to enable hostapd and dhcp to start automatically when the Pi turns on:
sudo update-rc.d hostapd enable
sudo update-rc.d isc-dhcp-server enable
Almost there! Create an HTML Web Server!
 1. Write an HTML page to host on your web server! Or download one I adapted from the Adafruit Digital Free Library 🙂
Here’s the zip file, and here’s the GitHub repository. Save and unzip the file.
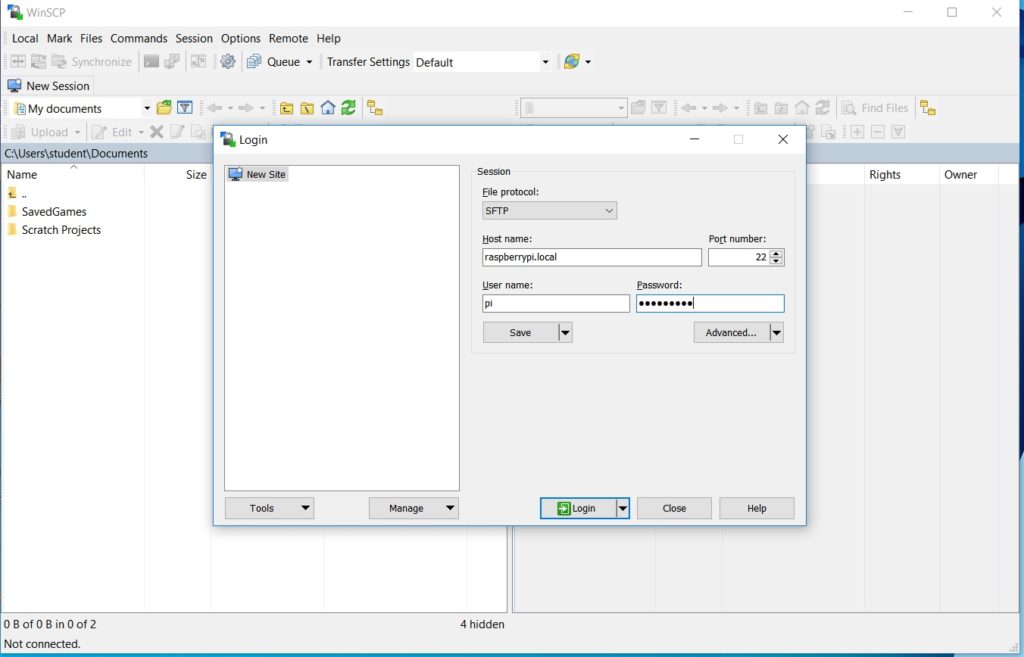
2. Open WinSCP and enter the hostname: raspberrypi.local
3. Log in to the Pi (type the username and password).
4. On the Pi side of the screen (right side), go to the home directory.
Click the folder with the up arrow on it two times.
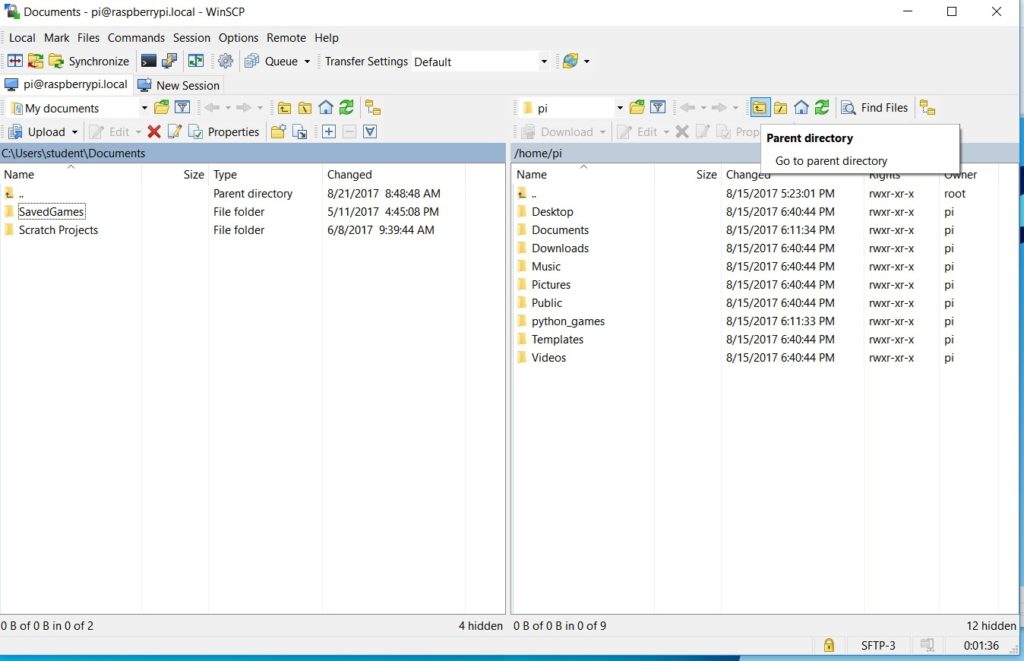
5.Go to the /var/www/html file.
Double-click on the folder labeled “var”, then the “www” folder”, and finally the “html” folder.
6. Delete the existing index.html file (or if you want to write your own you can just open and edit it).
7. Copy the web server files into the Pi html folder.
On the left side of the screen (your computer), go to the folder where you saved the files. Highlight and drag the contents (two folders and a file named “index.html”) into the Pi html folder. That’s it!
![]()
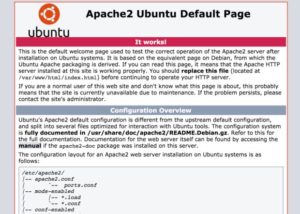
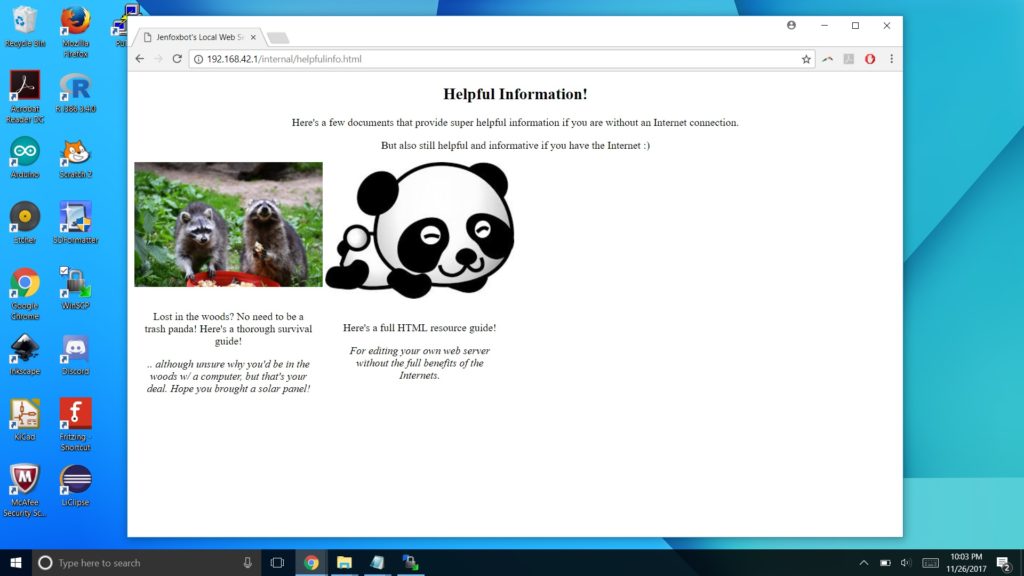
8. Open a browser and type “raspberrypi.local” in the navigation bar at the top. If it worked, you will see the web server page, what what!
Edit the HTML Pt. 1

Change up the HTML file to share the info and documents that you want!
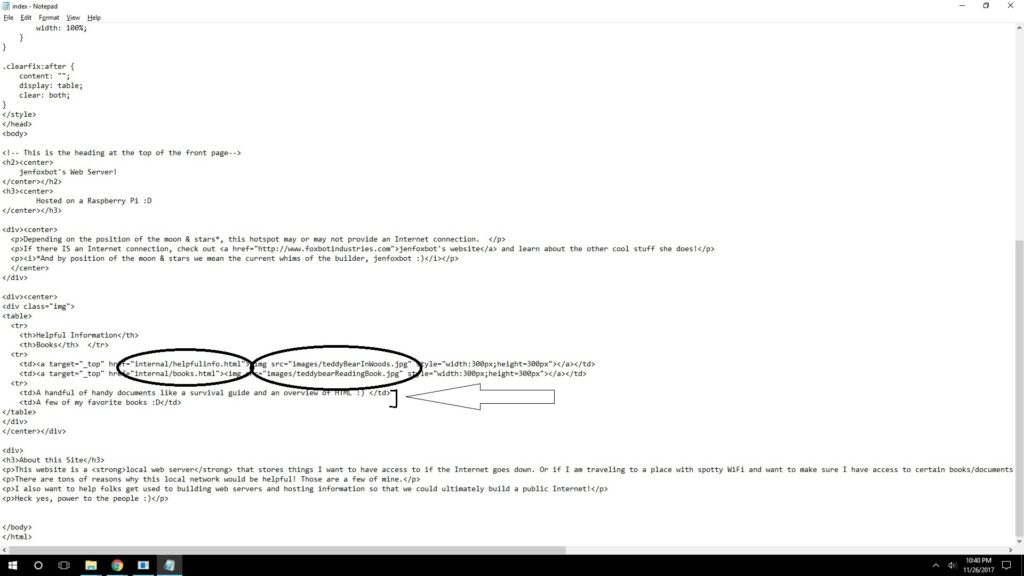
1. Open the index.html file on the Pi.
2. Edit the headers and descriptors in the index.html file.
— Change the title of your web server by editing the text between the title parts:
<title> jenfoxbot's Local Web Server!</title><br>
— Change the heading of the webserver by editing the text between the h2 and center parts (line 51):
<h2> <center>
jenfoxbot webserver
</center> </h2>
— Optional: Change the description of the webpage (line 55):
<pre><div><center>
<p>Depending on the position of the moon & stars*,
this hotspot may or may not provide an Internet connection.</p>
<p> If there IS an Internet connection, check out <a href="http://www.foxbotindustries.com" style="font-size: 12.15px;">jenfoxbot's website</a>
and learn about the other cool stuff she does! </p>
<p><i style="font-size: 12.15px;">*And by position of the moon & stars we mean the current whims of the builder, jenfoxbot :) </p> </i>
</center></div>
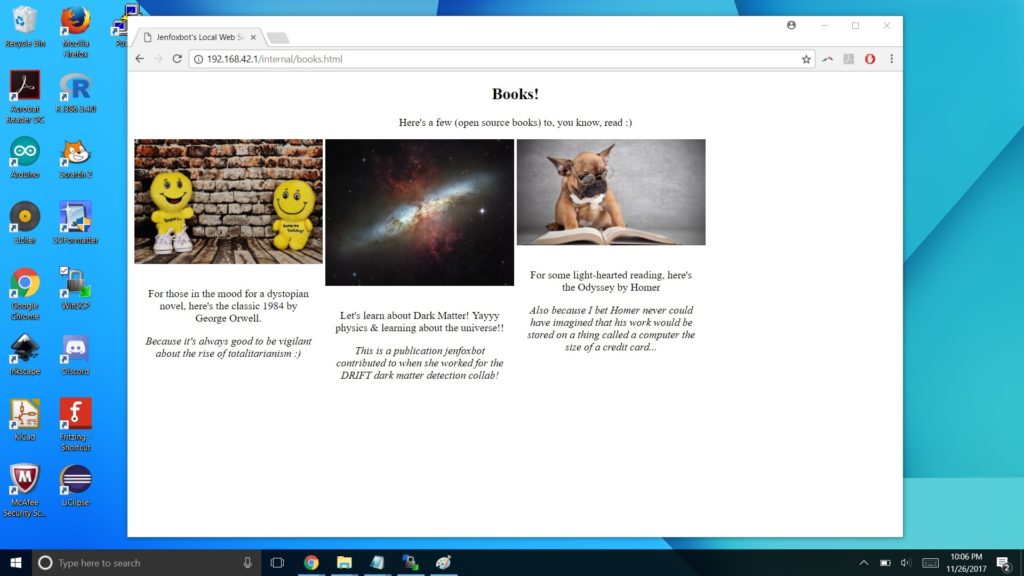
3. Optional: Delete existing documents, images, and videos and add your own!
Store PDFs in the “issues” folder and photos in the “images” folder. You can also create other folders to store different files.
Edit the HTML Pt. 2
1. Add your own documents!
— Decide what you want to include on your server and download PDFs of those docs. Also download images for each of the documents so you’ll have something fun to click on 😀

— Using WinSCP, add your documents to the appropriate folders.
— Edit the index.html or other appropriate html file (e.g. if you want to add or change a book in the helpful info page, edit the “helpfulinfo.html” file). Display your documents and images by changing the file names and extensions and update the descriptions.
2. For folks new to code, you can add more documents by copying and pasting the existing code and changing the file names and extensions!
Here’s a helpful overview on HTML from the Khan Academy!
OMG Finally! We’re Done 🙂
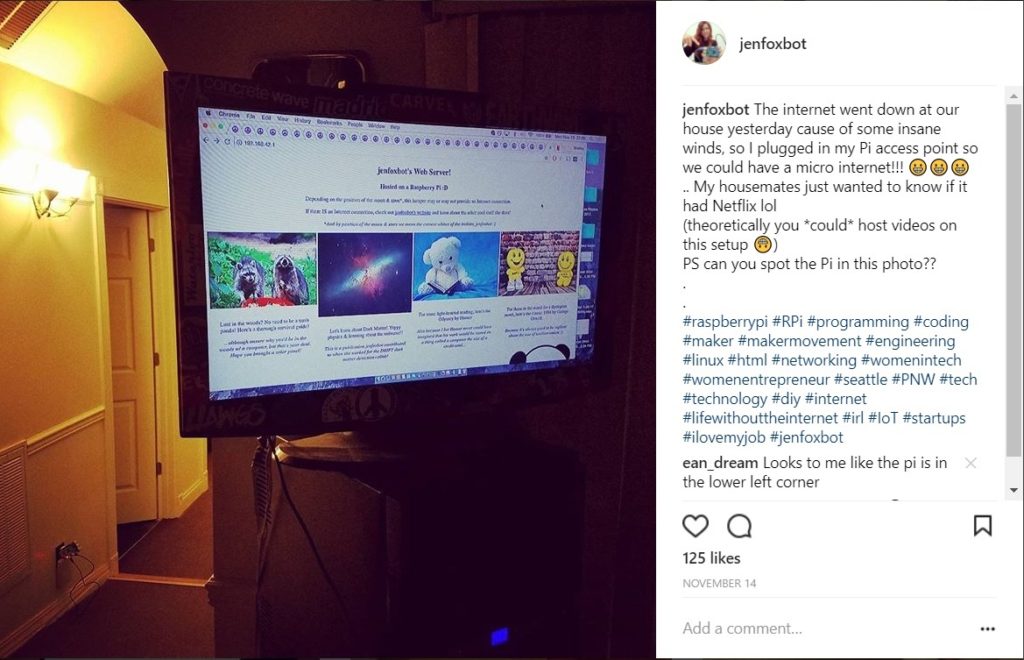
Unplug the Ethernet cable, connect to your wireless access point, and then type in the IP address in the address bar of your favorite browser (192.168.42.1 if you followed this tutorial exactly).
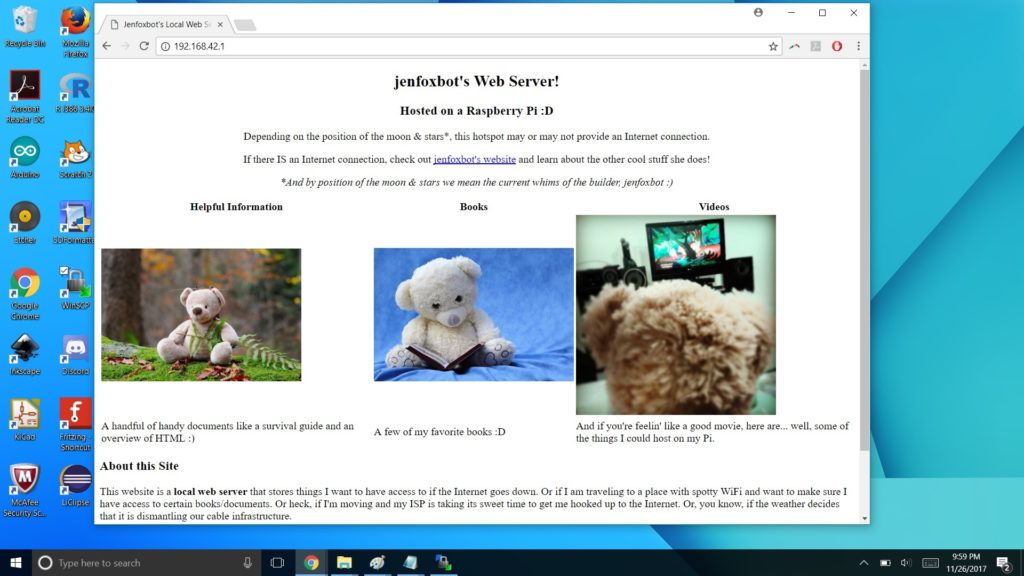
If everything is working, you’ll see your web page (like the screenshots of mine above and below). Woohoo you just created a wireless access point!! (If it didn’t work, run through the setup again and double check that all the terminal code is exactly as shown, including spaces and such).
Explore your very own local Cloud website and decide how you want to use it from here!
What’s Next?

One option is to use it as a local wireless storage device. Plug in the Pi, connect to the WiFi access point you set up (this one is named “HelloWorld”), and store or withdraw files from it. You can access these files even if you are disconnected from the Internet. So you could save your favorite movie and still watch it when the power goes out 🙂 (er, assuming you have a charged laptop).
Add more documents (e.g. you can use it as backup storage), play around with the HTML code to make your site all fancy, and have fun!
Another option is to configure this as a public-facing web page and assign it a domain name so other people can access the files. This is particularly helpful if you are going somewhere without WiFi or cable Internet — you can take Wikipedia with you! (but maybe donate to them if you do that ’cause they are awesome). If you are comfortable with code, you can set this up to be an automatic backup server, a local wireless game server for you and your friends, etc. Get creative!
If you go this route, be sure you know a bit about network security as the WPA2 password protocol has recently been compromised (sad panda..).
Finally, as mentioned in the intro, you can use this Cloud server to kickstart a people’s Internet! Have a build day with your friends to create a bunch of Cloud servers so that you all can “talk” to each other! This approach isn’t necessarily the *best* (aka most efficient/effective) way to build a public Internet, but it’s a great starting point. Plus, the better we understand how these technologies work, the better we use them to solve serious problems and advocate for ourselves and our communities. 🙂
Hello, this is a good tutorial! Instead of port forwarding to ethernet, is it possible to broadcast the server through the raspberry pi’s hotspot?
Yup! That is effectively what this project does — sets up the server to broadcast via the Pi’s onboard WiFi. There are a couple things to take note of: 1) by itself, this does not offer a connection to the world wide web (hence the network bridge via Ethernet) and 2) folks will need to know the local IP of the Pi to find its public content (this is where port forwarding and DNS routing come in if you want your content to be more easily discoverable). Happy hacking!
Thanks!
Happy to help! 😀